Many new home bakers pick a cute box first and check the rules last. Then the label doesn't fit, the brownies stain the lid, and a stack of boxes sits unused in the closet. If you want to know how to package baked goods to sell, flip that order. Check your state's cottage food rules and write your label. Then choose a food-grade liner and a box that fits each bake snugly.
Why this order? The rules decide what goes on the label, and the label size decides how much space the box needs. Doing it backward is like buying a frame before you know the size of the photo. Below you'll find an eight-step plan, a product-by-product table and simple fixes for the problems that ruin a sale.
What Do You Need to Package Baked Goods to Sell?
You need four things: a label that meets your state's rules, a food-grade liner, a box or bag that fits the bake, and a way to seal it. Ribbon, tags and printed boxes help you sell, but they come after the basics.
| Step | What you need | Time | Result |
|---|---|---|---|
| Check the rules | Your state's cottage food page | One evening of reading | You know what you can sell and what the label must say |
| Make the label | Recipe list, kitchen scale, label sheets | An afternoon | A label you can reuse for every batch |
| Cool and line | Cooling rack, parchment or grease-resistant paper | Until bakes are fully cool | No steam, no grease stains |
| Box and seal | Right-size box or bag, seal sticker | A few minutes per pack | A neat pack that shows if it was opened |
| Price it | A list of every packaging part | Under an hour | A price that covers your packaging, not just your flour |
How to Package Baked Goods to Sell, Step by Step
Follow these eight steps in order. Each one heads off a problem that would show up later if you skipped it.
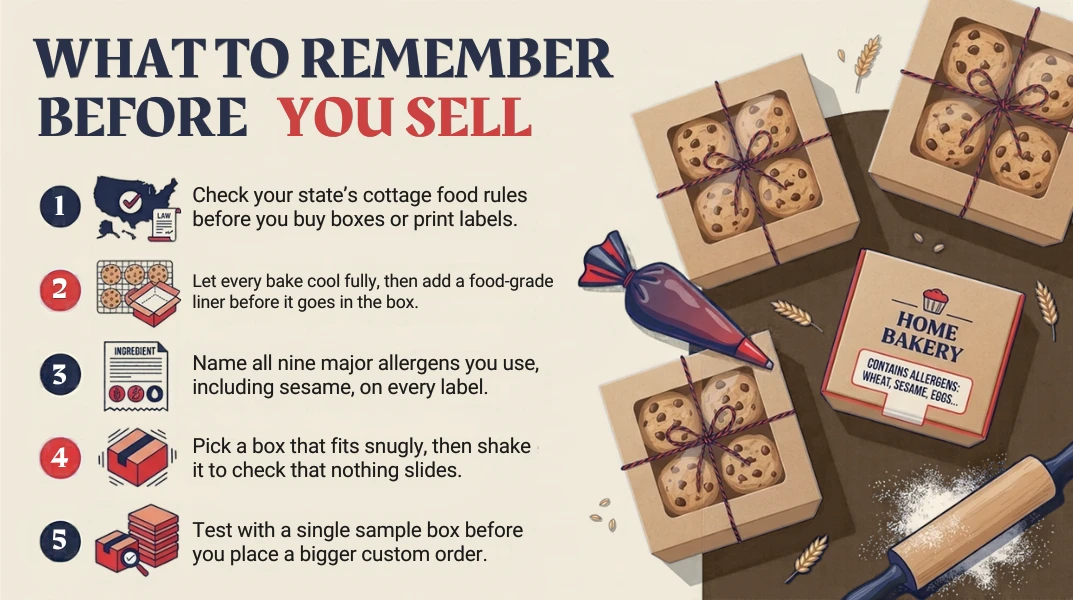
1. Check your state's cottage food rules first
A cottage food law is a state rule that lets you sell some low-risk foods made in your home kitchen. Each state writes its own version. It may limit which foods you sell, where you sell them and what the label must say.
Start with your state agriculture or health department, or your state's university extension office. Your cottage bakery packaging depends on what they say, because a label that's legal in one state can be wrong in the next.
2. Write a label that covers the basics
Your label is like an ID card for your treat. It tells the buyer who made it and what's inside. State labels often ask for some version of these items:
- Product name, such as "Brown Butter Chocolate Chip Cookies."
- Business name and contact info. Some states let you use a registration number instead of a home address.
- Ingredient list in descending order. That means you list every ingredient from the one you use most to the one you use least.
- Allergens, named in plain words (more on this in step 3).
- Net weight, if your state asks for it. This is the weight of the food alone, without the box, bag or ribbon.
- A home-kitchen statement. This is a short sentence saying the food was made in a home kitchen the state does not inspect.
Here's a real example. The University of Minnesota Extension cottage food labeling guide says a Minnesota label needs your name, your registration number or address, the date prepared, ingredients, allergens and a statement that the food is homemade and not state-inspected. The text must be at least 10-point and in English. A QR code can add extra info, but it can't replace anything the label must show. And if you pack baked goods at the time of sale, you must give the buyer the label information in print.
Maryland does it differently. The University of Maryland Extension cottage food law page says all food sold there must be properly labeled. Cottage labels need a set statement, in ten-point type, saying the food came from a cottage food business not subject to Maryland's food safety rules. The wording isn't the same as Minnesota's, which is why you shouldn't copy another state's label.
3. Name the nine major allergens, including sesame
The FDA lists nine major food allergens: milk, eggs, fish, crustacean shellfish, tree nuts, peanuts, wheat, soybeans and sesame. A food label must name the food source of each one you use. Sesame joined the list through the FASTER Act in 2021, and labels had to include it from January 1, 2023. Older label templates often leave it out.
According to the FDA guide to food allergen labels, the food source name only needs to appear once in the ingredient list. So "flour (wheat)" or "butter (milk)" does the job.
What about "may contain" warnings? These warn about cross-contact, which is when a bit of an allergen gets into food by accident, for example from a shared mixing bowl. A "may contain" line is extra. It never replaces listing the allergens you actually put in the recipe.
4. Let every bake cool all the way
Warm treats give off steam. In a closed box, that steam has nowhere to go, so it settles back on your bakes, like fog on a bathroom mirror. You get soggy cookie tops, sticky frosting and a cloudy window. Wait until the center is cool to the touch, not just the edges.
5. Add a food-grade liner
A food-grade liner is a paper or film sheet made to touch food. It sits between the treat and the box, so the food never rests on the bare box surface.
Picture the liner as a raincoat for your box. Grease-resistant paper is the best pick for brownies, donuts and buttery cookies, because it stops oil from soaking through. Parchment between layers keeps bars and frosted cookies from sticking together.
A quick note on coatings. Some grease-proof papers used to rely on PFAS, a group of man-made chemicals. The FDA questions and answers on PFAS in food say PFAS grease-proofers for paper food packaging were no longer sold in the US as of February 2024. In January 2025, the FDA said 35 food contact notifications for these grease-proofers were no longer effective. Some states have their own rules, too. When you buy boxes, ask your supplier which coatings and inks they use.
6. Pick the right pack for each bake
Every bake fails in its own way. Cookies break, brownies leak grease and cupcakes smear. Match the pack to the problem with this table.
| Bake | Best pack | What to add | Main risk |
|---|---|---|---|
| Cookies | Window box or sleeve box | Liner; divider for sets | Breaking and sliding |
| Brownies and bars | Small paperboard box or clamshell | Grease-resistant liner, parchment between layers | Grease stains, sticking |
| Cupcakes and muffins | Tall box with a window | Insert with a hole for each cupcake | Frosting smudged on the lid |
| Cakes | Tall cake box with a lid | Cake board underneath | Sliding and dented sides |
| Bread and quick breads | Paper bread bag or open-end sleeve | Sticker seal | Going stale or soft crust |
| Macarons | Slim box with a tray | Insert slots for each macaron | Cracked shells |
| Pies | Square pie box with a window | Liner under the tin | Tilting and crushed crust |
A few terms from the table. An insert, or divider, is a piece inside the box that holds each treat in its own spot. Paperboard (also called a folding carton) is the thin, smooth cardboard used for most bakery boxes. Corrugated board has a wavy layer inside, which makes it stronger, so it's the better choice for a shipping box.
7. Get a snug fit, then do the shake test
A box that's too big lets treats slide and crash into each other. A snug fit works like a seatbelt. Pack the box, close it and shake it gently. If you hear anything move, add a divider or crinkle paper, or switch to a smaller box. The whole test takes about five seconds.
8. Seal, brand and price it in
Close the pack with a tamper-evident seal, which is a sticker or band that shows if someone opened it. Add your logo sticker or tag. Then work out what the whole pack costs you (see the pricing section below) before you write a price card.
What to Remember Before You Sell
What Good Baked Goods Packaging Does (and Why It Works)
Good baked goods packaging does four jobs: it protects the bake, keeps it fresh, shows it off and carries your label. Each layer handles one of them.
The liner deals with grease and touch. The box deals with shape and crushing. The window does the selling, because people buy what they can see. The label builds trust and covers the law. Problems usually start when one layer tries to do two jobs, like a plain box with no liner trying to block grease.
How Do You Package Cookies to Sell?
Sell cookies in sets of three, four or six, stacked or laid flat on a liner inside a snug window box or sleeve. Sets look like gifts and are easy to price. Singles in a clear bag work well for impulse buys.
Our honest take: offer both. Put singles in bags near the cash box and sets in boxes at eye level. A set of six with a divider feels like a present, and that's the pack people pick up for teachers, hosts and coworkers. For thin or crisp cookies, stack them in a tube or sleeve so they hold each other up.
See the box styles on our custom cookie boxes page, from window tops to boxes with dividers.
How Do You Package Brownies to Sell?
Cool brownies fully, cut them clean, line each piece with grease-resistant paper and pack them in a small box that fits tightly. That stops sticking, grease stains and crumbly edges.
For the cleanest cut, chill the pan before slicing and wipe the knife between cuts. If you stack brownies, put parchment between every layer. Fudgy brownies and buttery bars stain plain paperboard fast, so never skip the liner here.
Farmers Market Baked Goods Packaging and Bake Sales
For markets, pre-pack everything at home, use clear windows so buyers can see the treats, and stack packs to build height on your table. Pre-packing keeps hands off the food and makes each sale quick.
- Portion before you go. Serving-size packs are easier to grab than a big tray you cut on the spot.
- Use stackable boxes. A short tower of boxes catches the eye from a few stalls away.
- Seal every pack. A tamper-evident sticker tells buyers nobody has touched the food since you closed it.
- Plan for the weather. The best baked goods to sell at farmers markets in summer are sturdy ones without soft frosting, like cookies, bars and quick breads.
The same ideas work for a school bake sale, a fundraiser, a craft fair or a farm stand. Firm packs and tight seals keep bakes fresh through a long, warm afternoon.
How Do You Package Baked Goods for Shipping and Delivery?
Cool the bakes, wrap each one and pack them tightly in an inner box. Put that box inside a sturdy corrugated shipping box, then shake it. If it rattles, add filling.
Some bakes travel much better than others. The best baked goods to sell online are firm and dry, like shortbread, biscotti, brownies, blondies and small drop cookies. Smaller cookies tend to break less than big ones. Keep soft-frosted cakes and cream pies for local pickup.
Many bakers also do a simple drop test. Drop a packed box from about waist height onto a soft floor, then open it and look. Broken edges show you where to add support. For more detail, read our guide on how to ship cookies without breaking.
Kraft, White or Window Box?
Kraft boxes give a rustic, natural look. White boxes make colors and logos stand out. Window boxes let the treat sell itself. Many bakers settle on white or kraft with a window.
| Option | Looks | Best for | Watch out for |
|---|---|---|---|
| Kraft | Brown, natural, homemade feel | Bread, cookies, rustic brands | Bright colors print darker on brown |
| White | Clean, bright, crisp printing | Cupcakes, macarons, colorful branding | Shows grease and fingerprints more |
| Window | Shows the treat | Market tables, gifts, pretty bakes | Messy bakes look messy, too |
| Solid | Clean surface for full branding | Gift sets, surprise unboxing | Buyers can't see what's inside |
Kraft paper is unbleached brown paper, and it's often recyclable. If sustainability matters to your buyers, ask about boxes made from recycled materials. Browse our kraft boxes, or compare styles in our post on bakery boxes with a window vs solid.
Bakery Packaging Ideas on a Small Budget
While you're still testing recipes, dress up plain boxes with stickers, tags and twine. Move to custom printed boxes once you have repeat buyers and a steady menu.
A round logo sticker and a striped twine bow can make a plain box look planned. Hand-written flavor tags feel personal at a market. The downside is time: every sticker goes on by hand, and a badly placed one can cover your ingredient list. Once you're packing dozens of boxes a week, a printed box does that branding work for you.
When custom printed boxes make sense
Your box is a silent salesman. It keeps selling after the buyer walks away, sitting on a kitchen counter or an office desk. Custom printing makes sense when your menu is set, your box size is tested and people keep coming back.
At Custom Box USA, you pick the custom size, material, finish and printing, on the outside, inside or both. Our free design support means you can upload artwork or just share your logo, and you'll see a design proof before anything is printed. There are no die and plate charges, and shipping is free across the USA.
Order a single sample first
Our minimum order is as low as 1 unit. So you can order one sample box, fill it with your real bakes and shake it before you buy more. It's a low-cost way to avoid a big order of boxes that don't fit. See all styles on our custom bakery boxes page.
How Do You Count Packaging Cost Per Item?
Add up every part of the finished pack, then add that to your ingredient cost before you set a price. Bakers who price on flour and butter alone end up paying for the box out of their own pocket.
Use this simple formula:
- Packaging cost per unit = box + liner + label + seal sticker + ribbon or tag + bag (if any)
- Total cost per pack = ingredient cost + packaging cost per unit
- Your price = total cost per pack + a fair amount for your time and profit
Keep the list on one sheet. Small items like twine add up over a big order, so re-check the list whenever you change a box or a supplier.
Common Mistakes and Fixes
Most packaging problems come from a short list of habits. Here they are, each with a fix.
| Mistake | What happens | Fix |
|---|---|---|
| Packing warm bakes | Steam makes tops soggy | Cool fully on a rack first |
| No liner for greasy bakes | Stains on the box | Use grease-resistant paper |
| Box too big | Treats slide and break | Use a snug box or divider, then shake test |
| Sticker covers the ingredients | Label can't be read | Plan a fixed spot for each sticker |
| Forgetting sesame | Allergen missing from label | Check all nine major allergens |
| Using only "may contain" | Real allergens not listed | Name every allergen you use |
| Copying another state's wording | Label may not meet your rules | Use your own state's official wording |
| Big first order before testing | Boxes that don't fit your bakes | Order a single sample first |
Pro Tips From the Packing Table
- Bring one spare sheet of labels to every market. Rain and spills happen.
- Keep flavors in separate packs. Strong flavors like mint or coffee can drift into milder bakes.
- Weigh one full pack to get your net weight, then check a few more to see that they match.
- Photograph every pack design so you can reorder the same look later.
- If your state allows it, bake bars or loaves in the pan you sell them in. That's one less step.
Plan Seasonal Orders Early
For holiday boxes, order early. You want time for design, a sample, production and shipping, and busy seasons fill up fast.
Our standard turnaround is 8 to 10 business days, and rush orders take 4 to 6 days. Timing may vary with order volume and location. With October nearly over, now is a good time to start on Christmas boxes. Plan Valentine's Day and Easter the same way.
Quick Checklist Before You Sell
- I read my state's cottage food rules.
- My label has everything my state asks for, such as name, business info, ingredients, allergens and the home-kitchen statement.
- I checked all nine major allergens, including sesame.
- Every bake is fully cool.
- Each pack has a food-grade liner.
- Nothing moves when I shake the box.
- Each pack has a seal.
- My price includes the cost of the packaging.
Frequently Asked Questions
How do you package cookies for a bake sale?
Pack them in small sets in clear bags or window boxes, and seal each one. Small sets are easy to price and grab. Use a liner for buttery cookies, and add a label if your school or state asks for one.
How do you package bake sale items?
Pre-pack every item in single servings with a seal. Firm, stackable containers hold up better over a long day than loose plates. Keep frosted items cool and out of direct sun.
How do you price baked goods to sell?
Add your ingredient cost and packaging cost per unit, then add a fair amount for your time and profit. Count every part of the pack, including the liner and stickers. Re-check your price whenever your costs change.
How do you package baked goods for shipping?
Wrap each bake, pack them snugly in an inner box, and place that inside a sturdy corrugated shipping box. Fill every gap and do a shake test. Ship firm bakes like brownies and small cookies, not soft-frosted cakes.
Do I need to list allergens on homemade baked goods?
Very likely, yes. Minnesota and Maryland, for example, both require allergen information on cottage food labels. Check the nine major allergens the FDA lists, including sesame, then read your state's cottage food rules for the exact format.
What is the best box for baked goods: kraft or white?
Choose kraft for a natural, rustic look and white for bright colors and crisp logos. Both work well with a window. Pick the one that matches your brand and your bakes.
Are your boxes recyclable?
We offer kraft and recyclable stock, and you can ask about boxes made from recycled materials. Our team can help you pick a material that suits your bakes and your liner. Visit our quote page to tell us what you need.
Next Step: Get a Free Quote
You've sorted out the rules, the label and the liner. Now give your bakes a box that fits well, looks like your brand and turns every pickup into a branded moment.
Custom Box USA offers custom sizes, materials, finishes and printing, plus free design support and free shipping across the USA. There are no die and plate charges, and you can start with a single sample. New customers get 20% off their first purchase. Tell us what you bake and how many boxes you need, and we'll reply to quote requests within 2 hours.
Get a free quote for your bakery boxes today.